How To Open APK Files On Windows 11
This is the step-by-step guide to open APK files on Windows 11.
1 How To Open APK Files On Windows 111.1 Opening APK Files On Windows 111.2 Enabling Hyper-V And Virtual Machine Platform On Your PC1.3 Download And Install Windows Subsystem For Android1.4 Opening APK Files On Windows 11
Opening APK Files On Windows 11
Opening APK files on Windows 11 is easy but a bit lengthy. We will be dividing the complete process into different sections to help make it easier for you. To open APK files on Windows 11, follow the steps given below-
Enabling Hyper-V And Virtual Machine Platform On Your PC
Firstly, you will have to ensure that you have enabled your PC’s Hype-V and Virtual Machine Platform. Given below are the steps to let you enable Hyper-V on your PC-
Open the Settings app on your Windows 11 PC by pressing the Windows + I key combo. On the left sidebar of the Settings app, click on Apps.
Now, click on the Optional Features option on the right side of the Apps section.
Next, click on the More Windows Features option under the Related Settings section.
Search for Hyper-V and check the checkbox beside it on the pop-up window that opens up.
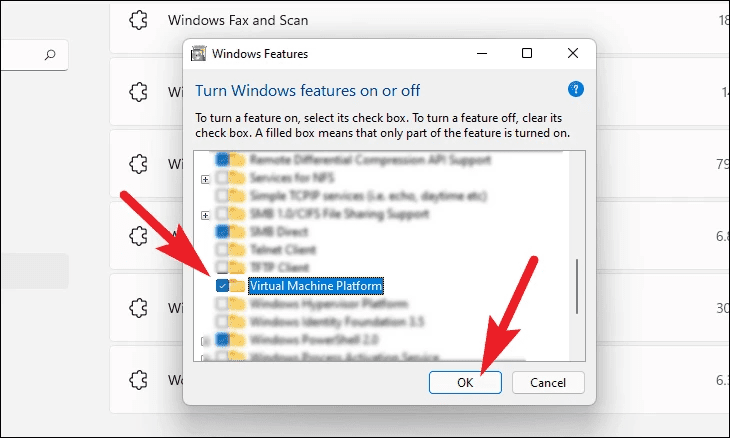
Next, search for and check the checkbox for Virtual Machine Platform. After doing so, click on OK, and Hyper-V and Virtual Machine Platform will be enabled on your PC.
Download And Install Windows Subsystem For Android
Next, you will have to download and install the Windows Subsystem for Android. It is a new component layer on top of Windows 11, including Linux Kernel and Android OS, to run Android apps on your Windows 11 PC. You can download and install the Windows Subsystem for Android from the Microsoft Store. To do so, follow the steps given below-
Press the Windows key to open the Start Menu on your PC. In the Start Menu, search for Microsoft Store and click on the relevant search result to open the Microsoft Store. In the Microsoft Store, search for Windows Subsystem for Android. Select the relevant search result and click on Get to install the Windows Subsystem for Android on your Windows 11 PC.
If you cannot install Windows Subsystem for Android, you can manually install it. Follow the steps given below to download and install Windows Subsystem for Android manually-
Firstly, download the Windows Subsystem for Android msixbundle. To do so, head to this link. On the window that opens up, click on the drop-down menu saying URL (Link) and select ProductID. In the given field, enter the product id as 9P3395VX91NR and search for the product. From here, download the Windows Subsystem for Android msixbundle. Next, head to the location where the file has been downloaded. Right-click on the file, and then from the context menu that opens up click on Properties. From the Properties window, note down the location of the folder somewhere as you will need it in the process ahead.Next, press the Windows + X on your keyboard, and then from the menu that opens up, select Windows Terminal (Admin). In the Windows Terminal, execute the following command Add-AppxPackage -Path “
Note- Here, replace copied path with the folder’s location and the
This will install the Windows Subsystem for Android. Now, open the Start Menu, and search for Windows Subsystem for Android, and you will find this option listed here.
Opening APK Files On Windows 11
Now that you are done with the above process, you will open the APK files on Windows 11 without any issue. To do so, follow the steps given below-
Download the SDK Platform Tools on your PC from this link. Open the link given, and you will find the SDK platform tools for Windows listed under the Download section.After you have downloaded the file, head to the location where the file has been downloaded. Now select the file, right-click on it, and click on Extract All. Next, copy the APK file you want to open on your Windows 11 PC and paste it inside the folder you have extracted. Note down the name of the APK file somewhere, as you will need it ahead in the process.Now open the Start Menu by pressing the Windows key. Here, search for Windows Subsystem for Android and hit Enter.
In the Windows Subsystem for Android (WSA), search for Developer Mode toggle and turn it on. Here, note down the IP address that you will see right below the Developer mode toggle.
Head to SDK Platform Tools extracted folder. Here, on the address bar, type CMD and hit Enter to open Command Prompt set to the current directory.
Here, enter the command adb.exe connect
Now your file will be installed on your PC. Once the process is completed, you will get a message regarding your screen.After doing so, search for the application you installed in the Start Menu, and you will find it listed here. Click on it, and you will be able to open the APK file on Windows 11.
This is how you can use your Windows 11 PC to open APK files. The above guide will walk you through the process of sideloading APK files on your Windows 11 PC. RELATED GUIDES:
Convert EXE to APK on Android and PCFix Windows 11 Widgets Not Working ProperlyRecord Screen In Windows 11Update Apps In Windows 11
Δ