Today, you can not expect your business to survive the fierce competition at an offline level. For any business to grow, the vital step to be taken is to go online. Web networking helps your business reach a large audience which results in overall growth. And in order to go on the web, you need a website. In this article, we will discuss how to make a website for your business from scratch and make it reach a larger audience. Learning how to make a website is no more rocket science, it is rather a simple task in the tech world that anyone can learn. There are tons of plug-ins available to make your task even easier. If you have chosen to make a website for your business that is the smartest decision. Let’s know the first thing of “how to make a website” is its ingredients which are needed and what are they?
1. Ingredients To Start A Website
Before you make any big purchases from website building software, make sure you know what is required to make a website. Ingredients > how to make a website are:
A domain name A web hosting service A website builder [we recommend WordPress default builder – gutenberg]
Now, we will be discussing each of these points in detail.
2. Choose A Domain Name
Before jumping to any software and apps, the very first step in making a website[how to make a website] is to choose a domain name.
What Is A Domain Name?
A domain name is the address of your website on the internet or in layman’s terms the name that your website will be called Domain Name for websites is exactly what a username is for social media platforms. For example, the domain name of YouTube is YouTube.com and for google, it’s like google. co.in[For India] or google.co.uk[For UK]. You need to choose your domain name carefully since that would be representing your business. So the domain name is first and important step in “how to make a website” so make sure to avoid the mistakes and follow these TIPS.:
Tips To Choose A Good Domain Name
Choosing a domain name for your website or your blog is a very crucial task in “how to make a website” and it should be a well-researched decision.
3. Choose A Good Hosting
Now that you have decided on your domain name it is time to choose your hosting provider and know about 2nd most important thing in “how to make a website“.
What Is Hosting?
Web hosting is the task or business that gives access and storage space to websites. A hosting company hosts your website and manages every behind the scene stuff related to your website. Choosing a good hosting company is very important as that lets you focus on your business more and manage the accounts instead of the website. Choosing a hosting company is outsourcing a huge task to another company which helps you a ton in “how to make a website“.
- Hostinger
Hostinger is one of the best companies with experienced staff in the market to outsource your website development and management. That is a key factor when looking for a good website hosting company with consistency and reliability. This is perfect for users who have a low budget. If you want to know how to make a website in a low budget then your buying should be fall in a low cost like hosting hosting. Let’s take a look in detail at how to make a website with Hostinger 1.How To Make A Website With Hostinger
Open up the Hostinger website and click on ‘get started.
This will take you to the plans page where you can choose a plan completely based on your requirements and offerings. The options are:
Now you need to choose the time period for which you are purchasing the plan. The options are 1 month, 12 months, 24 months, and 48 months. The longer commitment you make, the more you save.
After choosing the plan duration, you need to make an account on Hostinger. If you already have an account, you can just log in.
Next is the payment. Payment options are credit card, PayPal, Google Pay, Alipay, and CoinGate.
After the payment is successful, you will get an email with login information. Use that to login into your Hostinger account.
A ‘name your website’ option will greet you when you are logged in. You can either use an existing domain or choose a new one.
Next you will have to choose your data location.
Now log into your hostinger account and enter your credential login details.
Now after login, Click on “Manage”
Now scroll down and go to the “Domain” section of your cPanel. Click On “Add Website”
If you have your domain name in your Hostinger account then you can move to “16th STEP”.
Now enter your “Domain Name” and “Password” then click on “Add Website”
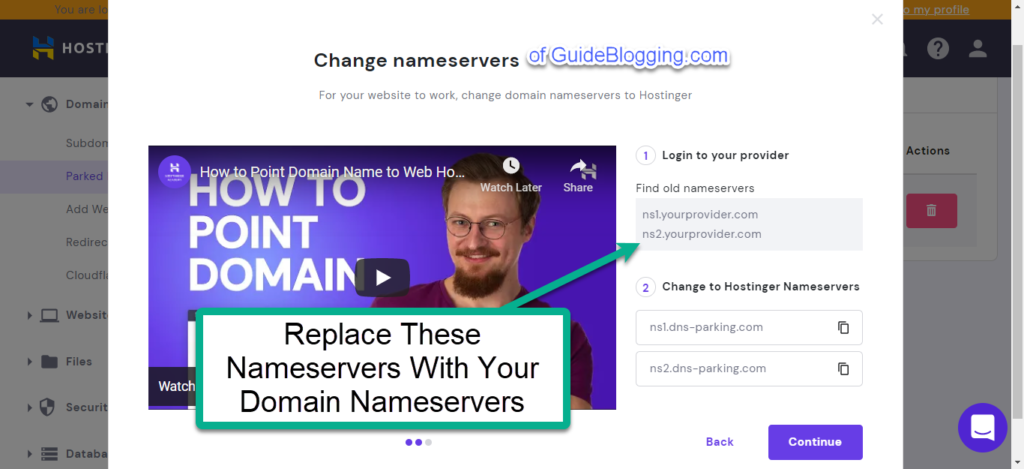
You have to replace your domain name’s current name servers with these hosting name servers:
ns1.dns-parking.com ns1.dns-parking.com
To replace your domain name and current server first log in to your platform account, then find and click on “Name Servers”
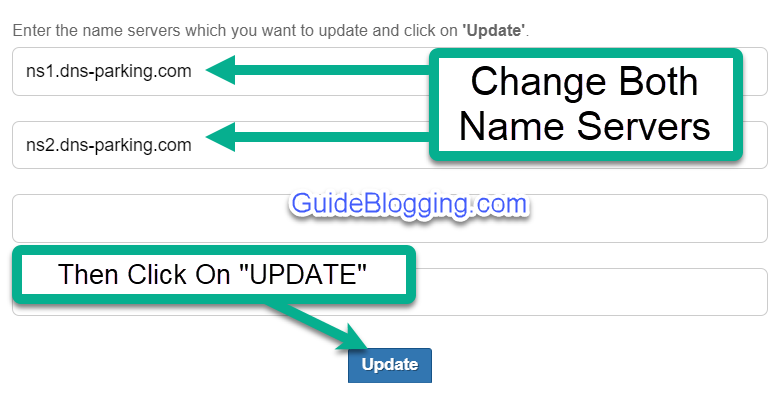
Replace both name servers, with these servers:
ns1.dns-parking.com ns1.dns-parking.com
Now your domain name is done. Let’s go back to cPanel again and find the “Website” section and click on “Auto Installer”
Then, select “WordPress”
Fill in the all details asked from you on the forum as shown below and click on “NEXT”.
After done with details have to click on “INSTALL”
Congratulations, Now your website is ready to go with WordPress C.M.S. You have to move now on directly to the “theme section” of this article.
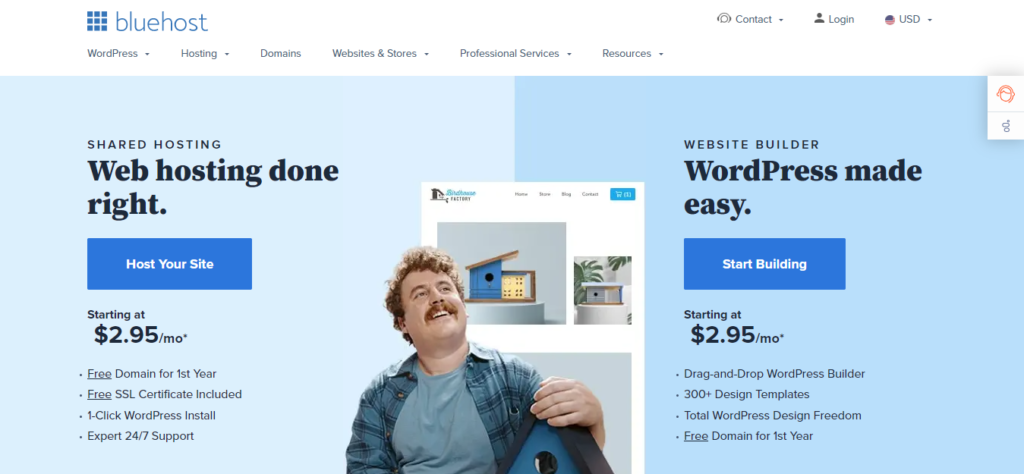
- Bluehost
If You are someone who cannot afford to spend a high amount on your website development and have a medium budget or
So if you have a little good budget and you’re interested in how to make a website with a medium budget then
You Should To Try Bluehost
Bluehost is an excellent website hosting company for people looking to develop their website on a low budget and get value for money with it.
You can get a domain for free for a year and it is super easy to use.
Let’s take a look in detail how to make a website with Bluehost
2. How To Make A Website With Bluehost
- Go to the Bluehost site. You will be greeted with the first page of the website that gives a brief overview of the significant features. Click on the ‘host your site option’.
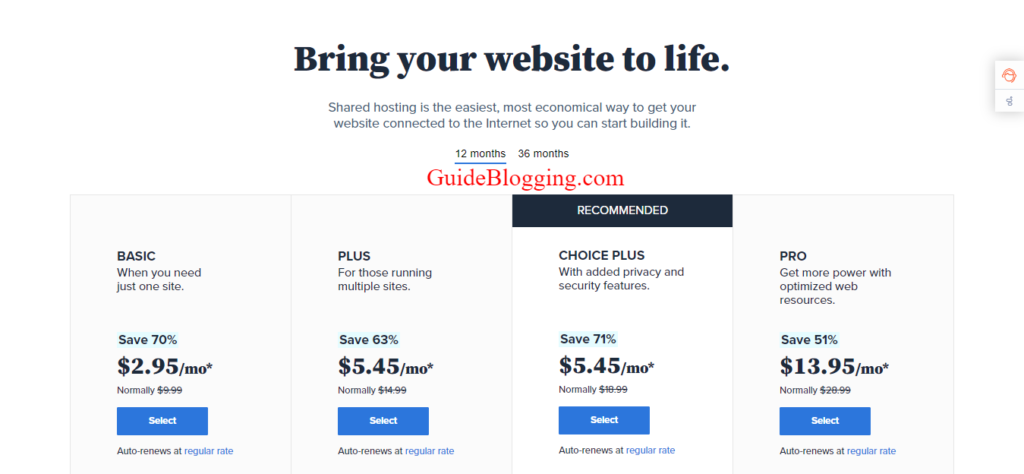
2. It will take you to the pricing page where you can choose from four plans for the duration of 12 months or 36 months.
Next you need to choose a new domain or type in an existing one. If you are not sure about the domain name, you can also skip this step.
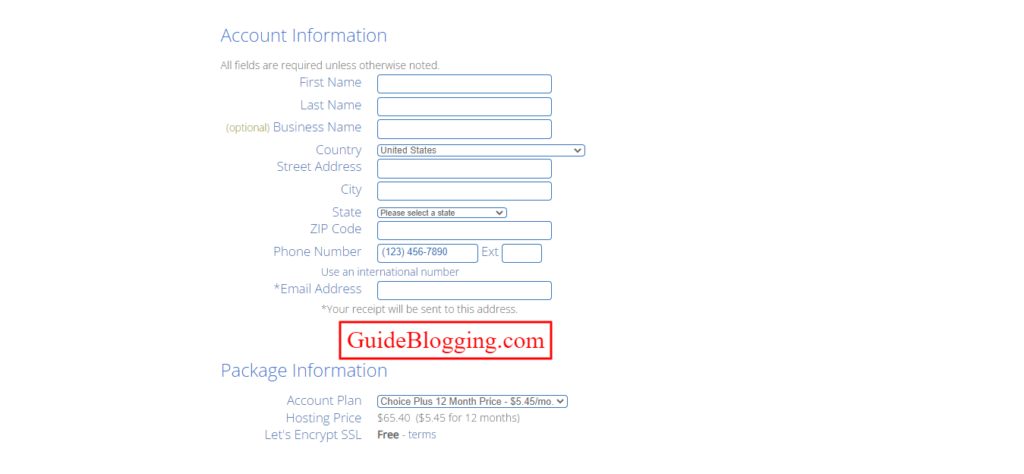
Next is the signup. You will have to sign in and fill out a bunch of information.
Scroll down and you get the package information and other add-ons you can get.
The last step is to make the payment with either a credit card or PayPal.
You will get payment confirmation and then you are ready to design your website.
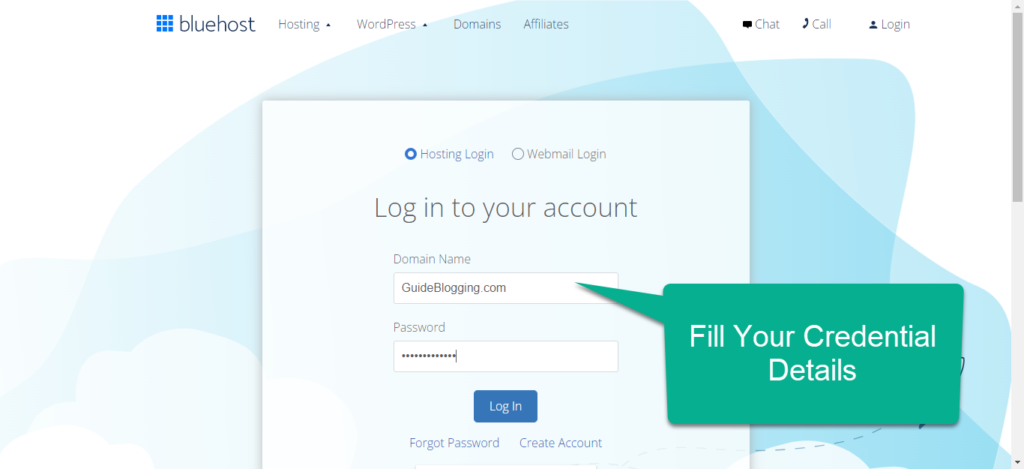
Now you have to log in to your bluehost account.
Enter your login credential details.
Select Your Domain Name as shown in picture below.
Click on “Assign” under the “Domain” category
If you have already your domain name in your Bluehost account then select via the drop-down menu or directly move to “18 STEP”. In case if you have a domain name from another platform then enter your domain name in the below box as shown in the image below.
Replace your domain name current name servers with these name servers given below:
ns1.bluehost.in ns2.bluehost.in
Login to your domain name platform, then find and click on “Name Servers”
Replace your Name Servers as shown in the image below and click on “UPDATE”
ns1.bluehost.in ns2.bluehost.in
Now, Scroll down and select “Addon Domain”
Give a name to your directory as shown in the image below.
We’ve done now domain name and hosting linking. Now Have to install WordPress on your domain name for that go to “My Site” then click on “Add Site” and then click on “Create New Site”.
Select normal WordPress and click on “Get Started” as shown in the image below.
Fill up all the details asked in the form as shown below, done click on “Next”
Now last step for launching site on WordPress CMS, Select your domain name by using the drop-down menu, which domain name do you want to be live if you have so many domain names and then click on “NEXT” and you’re done with WordPress website launch for next step you can move to “Theme Section” of this article.
Rocket.net
After discussing the ones with lower budgets and mid budgets, there still is a void to be filled for the ones with high budgets and while there might be another zillion domain providers but the best for such users will be Rocket.net. It is a simple, fast and secure website hosting company that believes in providing complete customer transparency and security while offering true value for money service. So if you have a big plan to start a big website for your company or how to make a website with the good budget then you should try rocket.net even guide blogging is also hosted on rocket.net Let’s take a look in detail how to make a website with Rocket.Net 3.How To Make A Website With Rocket.net
Similar to the other two, go to Rocket.net’s website and click on the ‘view plans’ option. You can also talk to an expert to discuss what type of plan and website type suits your business before buying a domain.
It will take you to all the plans offered by Rocket.net. Choose one that fits your needs.
The next step is to sign up or log in to a Rocket.net account.
After that, you will be taken to the payment window where you can pay with a credit card or PayPal.
You will get a payment confirmation and your website is ready to be designed! Hence, choosing a good hosting is very important for a person looking to develop a website based upon proper research and Matching every aspect of your needs and wants when building a website.
Setting Up A Blog Via Rocket.net Hosting
The first step in setting up your blog through rocket.net hosting is logging or signing in to your rocket.net account. You will be taken to your dashboard. and let’s move to the next step in how to make a website and live your site soon.
There, you need to click on the ‘create site’ option.
Then you need to enter your domain name and location and click on continue.
Next, fill in your rocket.net account details and click ‘continue’. It will take a few minutes to set the website up.
After that, you will be directed to the WordPress login page.
After logging in, you can start customizing your website on WordPress!
Before the configuration process, Let’s understand why only have to select WordPress and What is wordpress?
Now to choose a platform for your website it is necessary to choose the right platform for your website to work well and the best-recommended platform is WordPress. If you choose WordPress now in this how to make a website process then it can help you to automate you’re lot work with the help of plugins and create a beautiful website with awesome themes
What Is WordPress?
WordPress is a website building platform that helps its customers to build, publish and maintain the website without hiring technical staff for it. It competes with other platform companies like Wix, Squarespace, and others but the best feature is that while others will cost you money from minimal to very high, WordPress is a free platform providing better functionality than others. It is a superb service provider. WordPress is a self-hosted website that works as a content managing system for your website even if the domain is hosted by some other hosting company. Along with these features WordPress also provides themes and plugins to make your website hosting and managing experience even more seamless. Themes are the style sheets and templates to choose from that describe your website appearance whereas plug-ins are pieces of software that involve functions that can be uploaded on the website to make hosting a fast, easy task while keeping your website online. So WordPress is best website building platform in how to make a website with automation
4. Customize Up WordPress
Once you know about all the functions of WordPress, you need to configure your settings according to your needs and requirements on the site for your website. So let’s continue to how to make a website on WordPress with proper settings:
The General Screen
This is the very first screen of the word press where you can edit the basic information about your website.
In the first two fields, you can set the title and the tagline for your website.
Then, you will see URLs which will be a WordPress URL that denotes the actual location of your website and site address. That is the URL that will be used by the users to visit your website.
You will have to fill in all the required information about your website and everything that is asked by WordPress for the proper functionality of plugins and themes.
The Writing Screen
This is the section for writing all the blog posts that will be required by a website. It allows you to select the default category for your posts. There is also an option of creating posts via email which allows you to publish them directly online. There is also an update services box that gives you a notification whenever a new post is online.
Fill in the details that are asked by the website builder wordpress.
Go to the next window.
The Reading Screen
This section focuses on the appearance of your website to your visitors. It allows you to set your homepage which might involve all the recent blog posts.
- You can select from many options available on this setting and it is recommended to use a static page.
- Once you have filled it out, go to the next window.
The Discussion Screen
This screen focuses on all the comments that are there on your site. There are multiple options in this screen where a pingback notifies when somebody has linked to your content. Attract back will let you know when someone is writing something similar to your content related to it. You can also control spam from this setting.
Fill it out according to your needs
Go to the next window.
The Media Screen
Similar to these, there are many such screens on the settings like the media screen that lets you play with the media settings where you can set the size and everything regarding the image or any such media file you want to add to your website.
- You can either go with the default setting of image sizes or you can type in your own.
- Once done, go to the next setting.
The Permalinks Screen
The Parma link screen looks after the structures of all the URLs present on your website.
- Choose a format of your liking.
- Move on to the next setting.
The Privacy Screen
The privacy screen that works upon the security of your website is based on general data protection regulation (GDPR).
- You can either choose this default page or make one of your own for the privacy policy.
- You are done with the settings!
5. Select A WordPress Theme
After changing the setting you need to actually start building[how to make a website] what your site would look like to the visitors. For that very purpose, WordPress offers themes. So let’s figure out how to make a website with great UI/UX.
What Is A Theme?
Simply put, a theme is the main topic that all the sub-topics revolve around. In WordPress, themes are designs that take up a majority of your web pages including but not limited to graphics, background, and color tones.
Best Themes For Every Type Of Blog
Here are some of the best themes in WordPress for how to make a website with great UI/UX:
GeneratePress – GeneratePress is the theme that I am currently using in my this blog, and for me, it’s worked good so far because this theme is easy to customize so anyone newbie can customize it. The support of this theme is amazing. If I want to choose themes from all the above, I choose generatepress because of their stunning looks Generatepress is an amazing theme for how to make a website with great UI/UX even in guide blogging Generatepress theme is used.
Astra Pro – Astra Pro is lightweight and easy to customize the theme. This theme is like a generate press. but they have a lot of features which doesn’t available in generating press, and You can make your homepage attractive and responsive too by using elementor with that.
Newspaper
This theme offers the user a professional look to their website which is also appealing to visitors from across the globe. It is best suited for news websites.
- Spencer
It has a fully digitized main page with drag and drops functionality so you can easily set it up. This theme is modern and perfect for businesses that have millennials as their audience.
6. Essential Plug-Ins For WordPress
After setting up the theme, you need to deal with plugins. So let’s figure out how to make a website with automation.
What Is A Plugin?
Plugins are extensions that add more functions and features without disturbing the basic design.
Best Plugins For WordPress
Here are some of the best plugins for WordPress for how to make a website with automation & security and more functions.: So, here is the list of my plugins which I’m personally using almost in my website and help you to in how to make a website –
Elementor – These are the page builders for designing any page. These plugins allow you to create your dream landing page by just drag and dropping. I used both, and they are very lightweight to use and help me to create a stunning page. 2 .Rank Mathe SEO SEO is important to rank and drive a lot of traffic. Rank math is the new SEO plugin that becomes a favorite for every blogger now. Many bloggers suggest you go with Yoast, but I don’t recommend that because they don’t have lots of features like that. For information, you can read the website builder review on my blog.
WP Rocket – You already know that speed is one factor to rank on google. So wp rocket is the plugin, which helps you to optimize your full website and make it faster. I strongly recommend you to buy this plugin if you are looking for an alternative to this so you can go with autoptimize.
Thrive Leads If you want to collect emails of your readers so you can try to thrive leads which helps you to make popup lightbox, sticky ribbon, screen filler overlay, content lock, and more.
iThemes Security – Security is the no.1 priority; many times, somebody tries to hack your website, so this plugin helps you to secure your entire website. Using the security plugin is essential to keep your blog safe.
UpdraftPlus – Backup of your website is necessary, although your rocket.net keeps website backup daily. But for more security, I used this plugin to backup my website daily. This plugin helps you to backup your full website, and you can restore that data whenever you need it.
Anti-Spam – Many times, someone makes spam comments on your blog. This plugin helps you that if someone comment on your blog and comment looks like spam, so this plugin automatically removes it.
Resmush.it If you are writing an informative article that has a lot of image in it so this plugin tries to optimize your images and by this your website load fast.
Social Snap Pro – Social snap is a social sharing plugin, But I like this plugin so much because they help to drive traffic from mediums like – Facebook, Twitter, and many more platforms. These are the top plugins that I almost used in my all website to run them properly. I don’t recommend you to go with nulled or cracked plugins because these types of plugins are easy to hack by the hacker, and by this, you lose all your website data. If you want to do professional blogging and make money out of it, I highly recommend you keep the investment mindset and treat your blog like a business. If you are wondering how to install the plugin? Let me help with you that,
Is making my own website easy? With all the creative and affordable options out there, website making has never been easier.
How much does a domain name cost? Typically, a domain name costs between $10 to $20 per year.
Can I get a free domain name? Some website building software offers you a free domain name if you purchase their plan. That free domain will only last for a year.
Conclusion On How To Make A Website
At the end of this article, it is pretty clear how to make a website. Remember to follow the recommended steps to how to make a website in the best and most affordable way possible. You can connect to the recommended websites for your website development. Creating a website is, therefore, an easy, simple, and fun task that gives you returns. If you want to know more deeply about it like selecting a niche, how to make money through it, and many more then you can check out these articles.: Suggested Articles:
How To Start A Blog In 2022 From Scratch [Step By Step Guide] How to select a niche for blogging in 2022 – Step By Step Guide How Much Does It Cost To Start a Blog In 2022? – A to Z Guide 9+ Blogging Best Practices For 2022 – You Must Need To Know How To Make Money From Blogging In 2022 – Step By Step (A-Z) Guide 11 Awful Mistakes That Every Amateur Blogger Make How to Write a Blog Post (2022): A Step-by-Step Guide (A-Z)