Want to know How To Start blogging In India From Scratch? Start blogging is Good decision, That’s the best decision I ever made in my life to start a blog, Here is the deal; Do you want to make passive income on autopilot through start blogging, which helps you to live life like a boss? So starting a blog is the first and crucial step that leads you to success. But, After reading this guide, you will get to know How to start a blog in India and make a path for your success. Starting a blog In India is not complicated at all, but you need proper guidance, which helps you in how to start a blog in India. But Before starting the full process of making a profitable blog, Maybe some of you are thinking, about why you should start a blog in India? There are so many benefits if you start blogging your blog and grow it, Here are some Unforgettable Benefits of blogging that helps you :
- Express Yourself – Start Blog is a platform that allows you to express yourself by writing content for your audience.
- You can help others and gain fans – You can help the readers by writing the content on your blog, and by this, they will become your true fans which always there for your support.
- Make Money Online – Yes, You can blog from your blog by doing Affiliate Marketing and Running Ads. I think you got an idea about why you should start & how blogging will help you Let’s dive in, Here are the 7 easy blog step to how to start a blog in india without making a mistake and some bonus tips which help you to scale your new branded blog.
Step 1: Choose A Right Niche For Your Blog
This is the most important part, and many newbies are stuck at this point. Did you know? 99% of bloggers quit starting blogging in starting six months because they choose a niche that they don’t passionate about. Niche is like a topic but not a simple topic because they have several topics in it. Choosing a niche is the fastest way to lose a game in the beginning. Are you still confused? Let’s take an example about the niches – Smart Passive Income – Patt Flynn started this blog named Smart Passive Income, where he shares strategies to grow your online business. Today Smart Passive Income is one of the most successful blogs that make money which is making millions of dollars every day. ShoutMeLoud: You all know ShoutMeLoud is one of the most significant websites which teaches about WordPress, SEO, Blogging, and Much more stuff related to blogging. Don’t believe it? See this –
This is the earning report of ShoutMeLoud, and you can see that they make $400+ at the beginning of their blog. This shows that choosing a profitable and interest-based niche helps your blog to scale. There are many other blogs that I can show, but I think you got an exact idea of how niche is so essential for making a profitable blog. Currently, there are many profitable niches in which you can start your blog, but I don’t suggest you go with these niches because you don’t have an interest in that, and If you start a blog on that niche, so will be bored and quit blogging for sure. So, How you can find the perfect niche that you won’t regret later Wait, let me tell you one Fail-Proof method to find out a profitable and interesting based niche for you.
You have to focus on these two factors to find out a profitable niche for your blog. Profitability
- See that you can money make blogging from that?
- Do they have enough affiliate programs or not?
- Is that niche is having a good volume of keywords or not? Passionate
- Are you interested in working on that niche?
- Can you share the article about that niche?
- Can you solve other problems with your writing in that niche? I think now you can find the perfect niche after seeing the above part, and if you can’t figure it out, then you can do this to find an ideal niche.
- Take Paper & Pen
- Write down your interest or which you are passionate about (Add three or more) on the list
- Find the niche which you liked the most from the list
- Also, find an affiliate of that niche You are good to go These are some steps to finding a profitable niche for your new blog.
Step 2: Choose A Good Domain For Your Blog
Selecting the website domain is not very tough and you can easily select a perfect domain name for your new blog. If you decided on your domain name so you can skip this part. This is for you If you haven’t selected the domain name till now – When I started my blogging career, I don’t know how to choose a premium or brandable domain for my blog, And that’s why I wasted 10+ domains because I don’t like it also they don’t look brandable. I think you don’t make a mistake like me? If Yes! Here are four tips that help you to find your dream domain –
- Keep it Short & Simple – Try to keep your domain as short, don’t make it too long because it’s not easy to pronounce, and keep your domain name simply because it’s easy to remember. (Jon Morrow changed their domain name from BoostBlogTraffic to SmartBlogger, and their blog is getting millions of traffic because now his domain looks simple).
- Use Keywords – You can use the main keyword in your domain, which helps you in SEO.
- Don’t Use Numbers – You can’t use numbers in your domain because it’s not easy to remember the numbers
- Always Use TLD Extension – I recommend you to use a domain extension like .com because it’s for globally. If you are still not able to figure out the domain for your blog, then you can find them using LeanDomainSearch Note: For Domain, I will recommend you NameCheap Which blogging platform should you choose? I am not going to take much time here to explain to you which platform is best, There is a lot of blogging platform which you can use to make your blog, but I recommended you to go with WordPress.
Why? How to start a blog in India
Because on other platforms, you can’t have access to edit or customize everything, but blog WordPress gives you the freedom to make your blog as you can. In WordPress, you have many plugins and themes which you can use to make your blog Awesome! So I think you can get an idea of why WordPress is good, Let’s dive in and let me tell you the to steps create your blog.
Step 3: Choose A Good Hosting For Your Blog
For making a blog, you have to need web hosting and domain, I know you don’t know about both, but wait, let me guide you in this and tell you more about it. Domain Name – The domain name is the name of the website which readers types in the browser. Example Of Domain Name :
So If you are looking to buy a domain for your blog then I will highly recommend you try namecheap.com Web Hosting – Web hosting is a place where all your files of your blog are stored and show your blog lives when someone tries to access that. Hosting is like the hard disk of the computer, which stored all your data (images, blog posts, pages, and many more) and kept your data secured. Now, are you thinking about which WordPress hosting and Bog hosting is best for you? There are tons of web hosting packages that you can use to start (start blogging) your new blog. But I don’t recommend them to you because they are worthless. So instead of giving you a ton of blog hosting lists, I recommended you only 4 Web Hosting for beginners, and honestly, their support and service are fantastic and very reliable; it’s also not very costly like another web hosting.
Here Are Top 4 Web Hosting I Will Recommend You Which are the best fit for “How to start a blog in India“
Note: You Can Choose 1 Based On Your Budget & Requirements
So, are you excited to start your business? If Yes, then let’s dive into it, When I started blogging, I tried every cheap blog web hosting but the loading time is suck Then, I came to know about blog web hosting and after purchasing rocket.net The load time of my blog increasing dramatically. But WAIT! don’t take my word here, SEE THE PROOF BELOW,
BOOM! You can see after migrating to rocket.net the load time is decreased by 95% WAIT, But don’t take my word here; There are some of the latest REAL reviews about Rocket.net.
According to third-party tests and actual custom feedback, Rocket.net provides the World’s fastest WordPress Hosting. I hope I said enough about Rocket.net Let’s move forward In this part, I will guide you on how you can purchase web hosting from Rocket.Net You can also choose any other hosting you want. Still, I highly recommend you to go with Rocket.Net because it’s affordable and reliable for beginners who want to do blogging like a business.
Follow Steps To Buy Rocket.Net Hosting For Your Blog:
- Click On This Special Link To Get Rocket.Net $1 Trial For 30 Days
- Choose Your Plan Based On Your Budget
I recommend you to go with a basic or starter plan because it will be affordable for you and the Best Part? You will get a $1 trial for the first month So Go Here & Try a $1 trial for the first month 3. After Choosing Your Plan Click On Get Started 4. Create Your Account After Filling Up Details Inside Rocket.net
Enter Your Credit/Debit Card Information You have to fill in your credit/debit card details to purchase hosting
Click On Sign up After that, you have to click on the signup button. It will take a few minutes to proceed with the details. Wait a few minutes, then check your email for important details related to your Rocket.Net account. And you’re done. Note: You can also try out the other 3 web hosting as I recommended above based on your budget and requirements Congratulations! You have successfully purchased a hosting and domain for your. You have crossed the most prominent stop on your way to start your blog. But In case you forgot to buy a domain for your blog yet or confusing about the domain name which one should you have to pick up then
Blog post ideas
: I suggested you read the domain section of this blog post ideas to get more about it. After reading that, you got many names for your domain and purchase it from NameCheap Pick your domain name, which is easy to understand. Let example, if you are interested in opening a food blog and you decide the blog name is food Bazar so you can go with foodbazar.com.
Follow Steps Below To Buy Hostinger For Your Blog:
Hostinger Hostinger is one of the best companies with experienced staff in the market to outsource your website development and management. That is a key factor when looking for a good website hosting company with consistency and reliability. This is perfect for users who have a low budget. If you want to know how to make a website on a low budget then your buying should fall at a low cost like hosting. Let’s take a look in detail at how to make a website with Hostinger
Open up the Hostinger website and click on ‘get started.
This will take you to the plans page where you can choose a plan completely based on your requirements and offerings. The options are:
Now you need to choose the time period for which you are purchasing the plan. The options are 1 month, 12 months, 24 months, and 48 months. The longer commitment you make, the more you save.
After choosing the plan duration, you need to make an account on Hostinger. If you already have an account, you can just log in.
Next is the payment. Payment options are credit card, PayPal, Google Pay, Alipay, and CoinGate.
After the payment is successful, you will get an email with login information. Use that to login into your Hostinger account.
A ‘name your website’ option will greet you when you are logged in. You can either use an existing domain or choose a new one.
Next you will have to choose your data location. Follow Steps Below To Buy Bluehost For Your Blog:
Bluehost
If You are someone who cannot afford to spend a high amount on your website development and have a medium budget or
So if you have a little good budget and you’re interested in how to make a website with a medium budget then
You Should Try Bluehost
Bluehost is an excellent website hosting company for people looking to develop their website on a low budget and get value for money with it.
You can get a domain for free blog
for a year and it is super easy to use.
Let’s take a look in detail at how to make a website with Bluehost
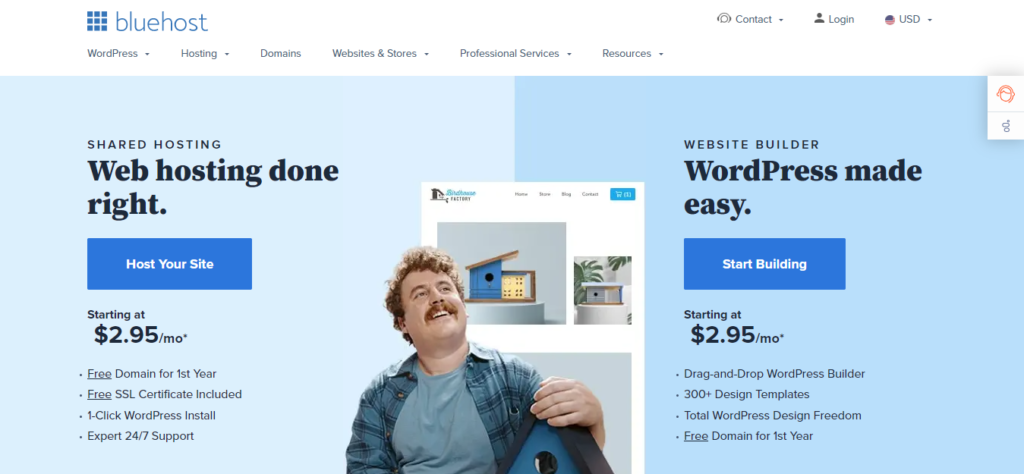
- Go to the Bluehost site. You will be greeted with the first page of the website that gives a brief overview of the significant features. Click on the ‘host your site option’.
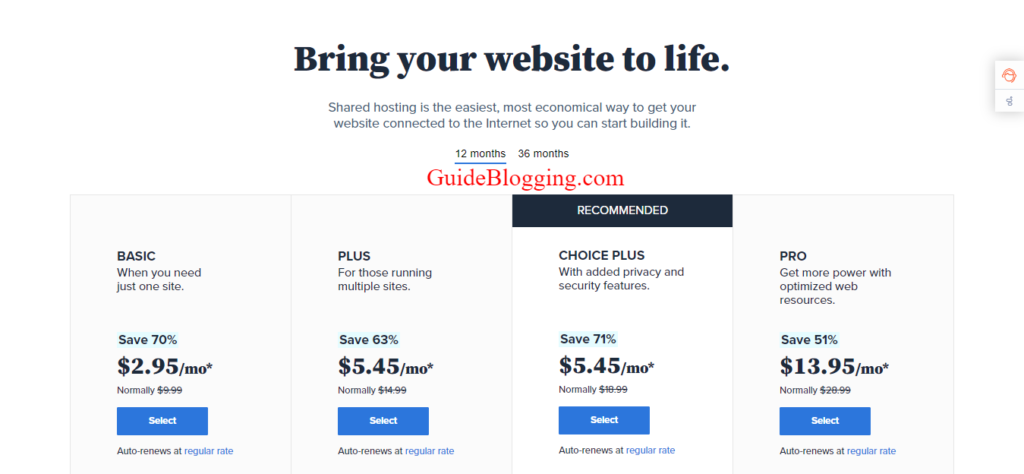
2. It will take you to the pricing page where you can choose from four plans for the duration of 12 months or 36 months.
Next you need to choose a new domain or type in an existing one. If you are not sure about the domain name, you can also skip this step.
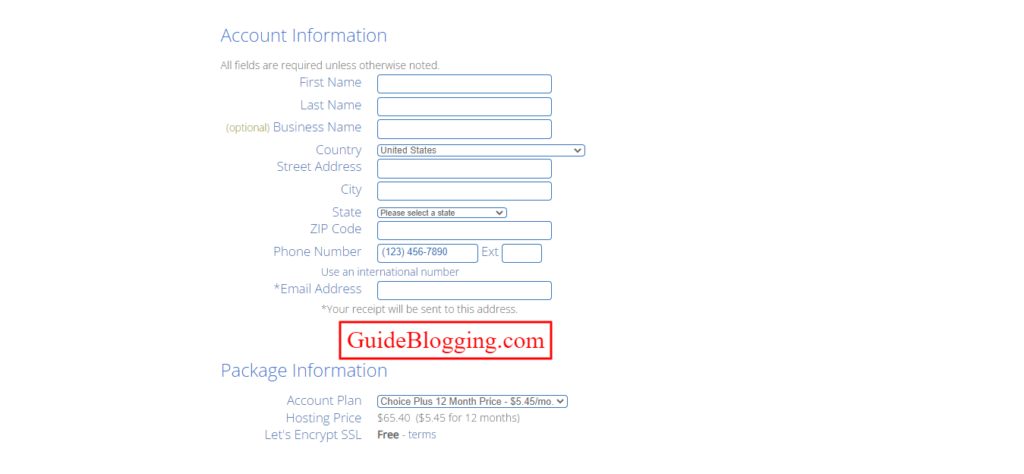
Next is the signup. You will have to sign in and fill out a bunch of information.
Scroll down and you get the package information and another add-on you can get.
The last step is to make the payment with either a credit card or PayPal.
You will get payment confirmation and then you are ready to design your website.
Step 4: Set Up Your WordPress Blog
Installing WordPress is not like rocket science, The only thing is that we have a proper guide. Here in this part, I will how you can set up your WordPress site to make it live on the web. Let’s move on and see
How to Start A Blog in India Using Rocket.net Hosting
Now login to the Rocket.net client panel. Enter your login details and hit “Log in”
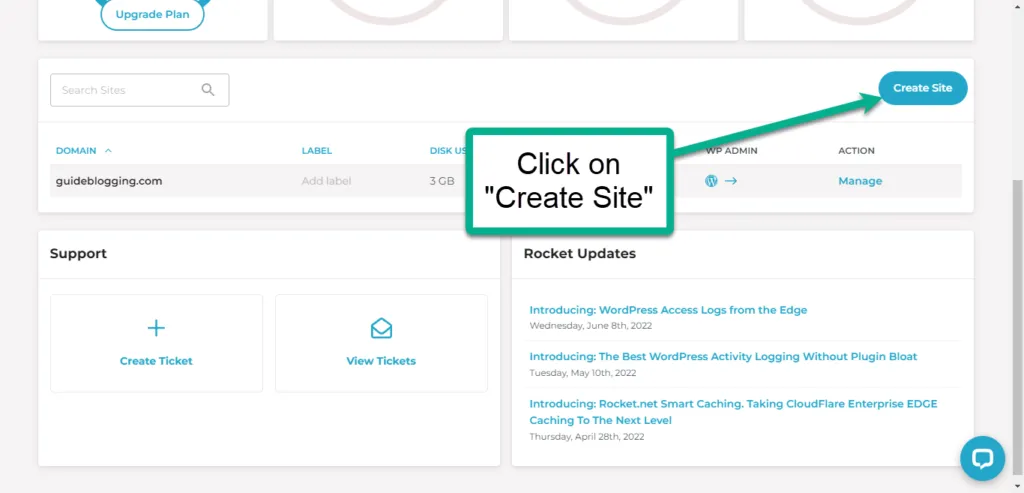
Click on “Create Site”
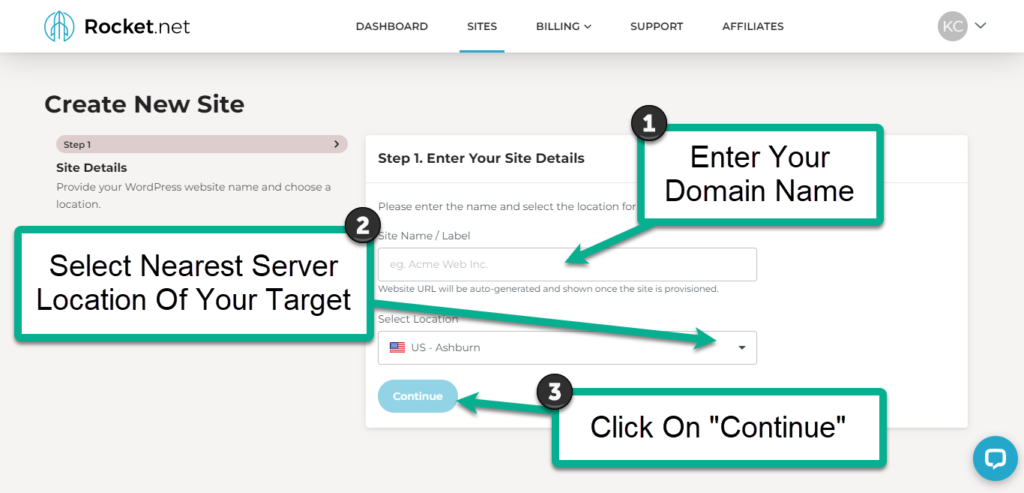
Enter your domain name in the first blank then select the best nearest server location according to your target audience.
Click on “Continue“
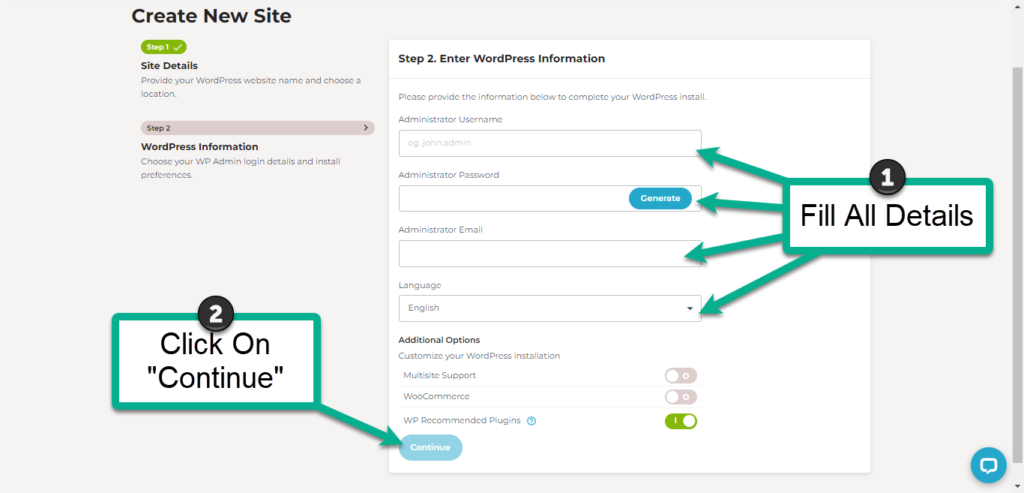
Fill in all the asked details as shown below in the picture and select the language, Then click on “Continue”
log in to your site by using this permalink: You have to replace your domain name in this permalink with “your domain” for example for guide blogging we have to use “https://guideblogging.com/wp-admin”
Then fill in your details and click on “Log In“
Let’s move on and see How to Start A Blog in India Using Hostinger Hosting
Now log into your hostinger account and enter your credential login details.
Now after login, Click on “Manage”
Now scroll down and go to the “Domain” section of your cPanel. Click On “Add Website”
If you have your domain name in your Hostinger account then you can move to “16th STEP”.
Now enter your “Domain Name” and “Password” then click on “Add Website”
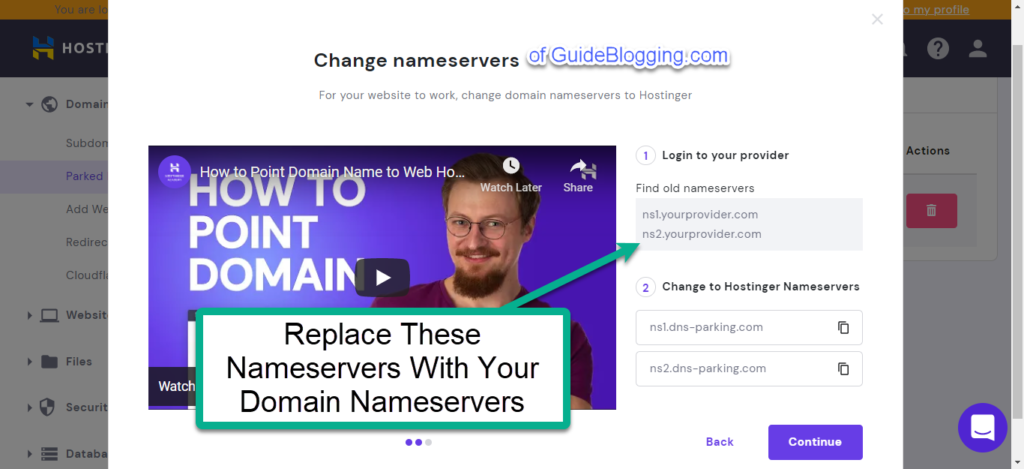
You have to replace your domain name current name servers with these hostinger name servers:
ns1.dns-parking.com ns1.dns-parking.com
For replace your domain name and current server first log in to your platform account, then find and click on “Name Servers”
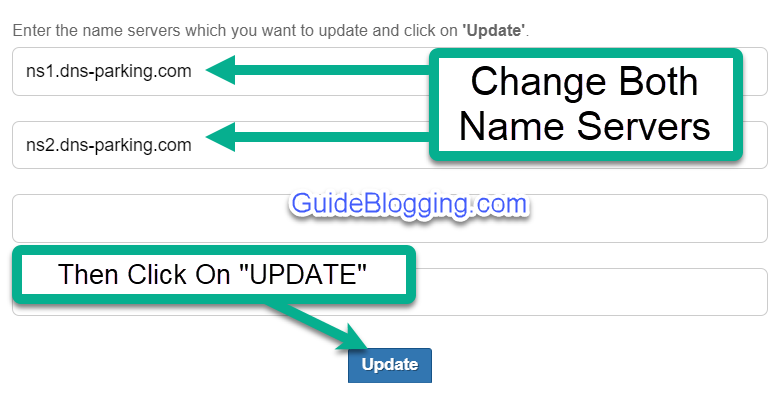
Replace both name servers, with these servers:
ns1.dns-parking.com ns1.dns-parking.com
Now your domain name area did. Let’s go back to cPanel again and find the “Website” section and click on “Auto Installer”
Then, select “WordPress”
Fill in the all details asked from you on the forum as shown below and click on “NEXT”.
After done with details have to click on “INSTALL”
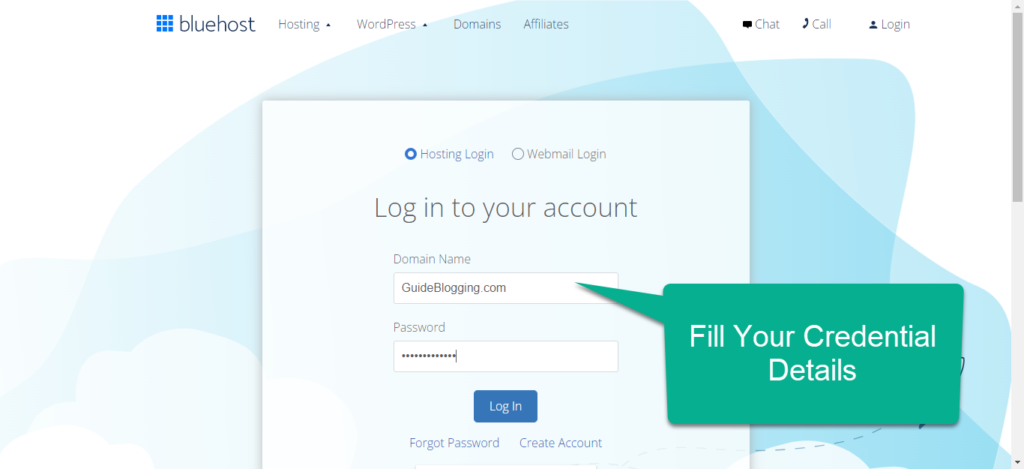
Let move on and see How to Start A Blog in India Using Bluehost Hosting
Now you have to log in to your Bluehost account.
Enter your login credential details.
Select Your Domain Name as shown in the picture below.
Click on “Assign” under the “Domain” category
If you have already your domain name in your Bluehost account then select via the drop-down menu or directly move to “18 STEP”. In this case, if you have a blog domain address name from another platform then enter your domain name in the below box as shown in the image below.
Replace your domain name’s current name servers with these name servers given below:
ns1.bluehost.in ns2.bluehost.in
log in to your domain name platform, then find and click on “Name Servers”
Replace your Name Servers as shown in the image below and click on “UPDATE”
ns1.bluehost.in ns2.bluehost.in
Now, Scroll down and select “Addon Domain”
Give a name to your directory as shown in the image below.
We’ve done now domain name and hosting linking. Now Have to install WordPress on your domain name for that go to “My Site” then click on “Add Site” and then click on “Create New Site”.
Select the normal WordPress blog step and click on “Get Started” as shown in the image below.
Fill up all the details asked in the form as shown below, done click on “Next”
Now the last step for launching the site on WordPress CMS is, Select your domain name by using the drop-down menu. which domain name do you want to be live if you have so many domain names and then click on “NEXT” and you’re done with the WordPress website launch for the next step you can move to the “Theme Section” of this article.
Step 5: Choose An Attention Grabbing Theme
After installing WordPress, theme, and blog looks are more important if you are just starting your new blog. In blogging, the design of the blog matters because if you don’t have a great design. so you are losing a lot of traffic and audience. Good design helps to build more trust in your readers. In your WordPress inventory, there are a hell lot of free themes that are available for you. but I don’t recommend you to go with that themes because these free blogs are easy to hack, and by this, you will lose all your website data. If you are using blog-free or nulled themes is like Architecting your own Destruction. If you want to do blogging web hosting as a business, so invest in themes and plugins because this is the best investment in your blogging journey. I see many bloggers don’t invest in this type of thing and face many critical issues later. So which theme is best for you? I use GeneratePress, which is the lightest theme (under 50KB), and loads your website fast, and also I liked the design of this theme, and many pro bloggers are using it because it’s easy to design. There are a few more themes that I can suggest but before that let me tell you a Few things which you keep in your mind while purchasing a theme –
- Make sure that the premium themes which you are purchasing are lightweight and easy to use.
- Check that the theme is compatible with your latest WordPress version.
- Always check that the theme is responsive or not
- Support is the main thing, so try to find a theme that has excellent contact support (like Generatepress and AstraPro).
- Now let me tell you some of my favorite paid themes that I am currently using on my other blogs.
Some Of My Favorite Themes (Personally Used)
Which also helps you in “how to start a free blog in India“.
GeneratePress – GeneratePress is the theme that I am currently using in this blog, and for me. it’s worked well so far because this theme is easy to customize so anyone newbie can customize it. The support for this theme is amazing. If I want to choose themes from all the above, I choose to generate press because of their stunning looks
Astra Pro – Astra Pro is lightweight and easy to customize the theme. This theme is like a generating press, but they have a lot of features which doesn’t available in generating press, and You can make your homepage attractive and responsive too by using elementor with that. After picking one theme now it’s time to install that theme on your blog. For installing any WordPress theme on your blog just follow these below steps: First of all, you should be login on to your WordPress dashboard ➡ appearance ➡ themes
In the themes section, you will find various free blogging WordPress themes, but if you already have so, click on the add new button.
Click on the upload theme and upload your theme zip and activate that theme on your blog.
Finally, you installed and activate your preferred theme on your blog. Installing a theme is an easy task. but the main and important task is to customize that theme. So if you want to customize your theme, click on appearance ➡ customizes, and now you can able to customize your theme. After making your theme responsive and optimized now. I will tell you some of the most essential plugins which almost every WordPress users install, and it’s also an important part to run your website on automation.
Step 6: Some Essential Plugins for WordPress
These plugins will make your work easier in “how to start a blog in India”
WordPress without plugins is nothing because plugins are necessary to (Optimize your blog content, for SEO, Speed, and many more). There are lots of plugins on WordPress, but there are some plugins that I am currently using and making such things on autopilot. Want to know the list of my favorite plugin?
So, here is the list of my plugins which I am personally using almost in all my website –
- Elementor –
These plugins help you in how to start a blog in India to design your blog easily
These are the page builders for designing any page. These plugins allow you to create your dream landing page by just drag and dropping. I used both, and they are very lightweight to use and help me to create a stunning page. 2. Rank Math SEO
This plugin helps you in how to start a blog in India to optimize your blog for SEO easily with an awesome interface
SEO is important to rank and drive a lot of traffic. Rank math is the new SEO plugin that becomes a favorite for every blogger now. Many bloggers suggest you go with Yoast, but I don’t recommend that because they don’t have lots of features like that. For information, you can read the review on my blog. 3. WP Rocket –
This plugin helps you in how to start a blog in India to boost your website speed and load it in seconds.
You already know that speed is one factor to rank on google. So wp rocket is the plugin, which helps you to optimize your full website and make it faster. I strongly recommend you to buy this plugin if you are looking for an alternative to this so you can go with autoptimize. 4. Thrive Leads
This plugins helps you in how to start a blog in India to collect leads via your blog.
If you want to collect emails of your readers so you can try to thrive leads which helps you to make popup lightbox, sticky ribbon, screen filler overlay, content lock, and more. 5. iThemes Security –
This plugin helps you in how to start a blog in india to more secure your blog.
Security is the no.1 priority; many times, somebody tries to hack your website. so this plugin helps you to secure your entire website. Using wordpress security plugins is essential to keep your blog safe. 6. UpdraftPlus –
This plugin helps you how to start a blog in India to have a backup copy of your blog with an updated version of it.
Backup of your website is necessary, although your rocket.net keeps website backup daily. But for more security, I used this plugin to back up my website daily. This plugin helps you to back up your full website, and you can restore that data whenever you need it. 7. Anti-Spam –
This plugin helps you in how to start a blog in India to remove all spam comments which saves you time a lot.
Many times, someone makes spam comments on your blog. This plugin helps you that if someone comment on your blog and the comment looks like spam, so this plugin automatically removes it. 8. Resmush.it
This plugins helps you in how to start a blog in India to compress your image and make them lighter without compromising with quality.
If you are writing an informative article that has a lot of image in it so this plugin tries to optimize your images and by this, your website loads fast. 9. Social Snap Pro –
This plugins helps you in how to start a blog in India to bring social share to your page, and articles.
Social snap is a social sharing plugin, But I like this plugin so much because they help to drive traffic from mediums like – Facebook, Twitter, and many more platforms. These are the top plugins that I almost used on my all website to run them properly. I don’t recommend you to go with nulled or cracked plugins because these types of plugins are easy to hack by the hacker, and by this, you lose all your website data. If you want to do professional blogging and make
e-money out of it, I highly recommend you keep the investment mindset and treat your blog reply biswajeet das like a start blogging business. If you are wondering how to install the plugin? Let me help with you that: Now let’s move on to other topics, Till now we learned about Blog Posts :
- How to start blogging in India
- Selecting the best theme for the blog post
- Using plugins to save our time Now, Let’s move to “how to “write blog posts”
Step 7: Write Your First Stunning Post & Published It
Are you wondering about writing your first blog post? So let me help you to write your first post on your blog reply biswajeet. First of all, I want to congrats you that you have successfully set up your WordPress blog, and now it’s time to make a blog post for your new blog. For creating a blog post, you have to go: Dashboard → Post → Add New After that, you will land on your blog posts, and here you can start writing your first stunning post.
Now, Let me give you some tips that help you to make your first epic post:
If you are confused about finding the topic of your new blog post, so I recommended you do some keyword research around your niche, and by searching, you will find many awesome keywords that are easy to rank.
Pro Tip: I recommend you go with long-tail keywords because it’s easier to rank. 1. Blog post title: Always tries to make an awesome blog post title by using numbers and powerful words. 2. Make sure you should add some images for making your article more comprehensive; I strongly recommend you to make your article lengthy and more in detail, and by a more detailed blog post, you can make your reader your true fan. 3. I suggest you go through the on-page guide so you can optimize your blog content easily. 4. Use words like I and You to connect with your readers and try to don’t take copyrighted images from google. I recommend you always use copyright-free images. I think these tips help you to create your first blog post, Now, Let’s move on to the favorite of every blogger. How to start a blog in India and earn through it.
Step 8: Some Ways To Make Money Blogging From Your Blog
This is the bonus part for you all, where I shared some ways which help you to blog make money from your blog. Before starting, let me Congrats, you because you have published your first blog post on your blog. Let’s dive into it, There are several ways you can use to make money from your blog. In this part, we will discuss some ideas which you can use to handsome make money blogging from your blog. I have created a list of ways that helps you to make your first dollar online, Are you excited enough like me? If Yes, then let’s move on to the list:
These are the ways that you can use to how to start a blog and make money in India. But always remember that if you want to from your blog post so you have to keep patience and do hard work on your blog, and you will see your massive growth.
Q.1 How much does it cost to Start a Blog In India?
Starting a blog post it cost you around $1 for the first month from rocket.net but I recommend you to go with one year plan to get a special discount.
Q.2 How to start a blog in India and get paid?
In this guide, we already tell you how to start a blog in 2023, and for getting paid from your new website you can use Google Adsense, Affiliate marketing, and many more earning methods.
Q.3 How to start a blog business?
For making a blog you can read this comprehensive guide and also you can make your blog post for only business purposes.
Q.4 I started my blog but how can I get traffic?
Traffic works as a motivation for newbie bloggers so if you are confused about how you can get traffic, Here is a full guide about it – Increase Website Traffic Fast.
Q.5 Is starting a blog in 2023 still worth it?
Yes! and The reason why you are here is that you also want to start your blog in 2023 and If you are taking Blogging as a business then it’s still worth it
Q.6 Can I start a blog for free?
Yes, you can start your blog for a start blogging free using a platform like Blogger but I don’t recommend you to do that because if you want to make real money from your blog so you need to understand the power of an investment. I recommend you that don’t go with free and purchased hosting and start your new blog today. Wrapping Up and Now What Next? Congratulation! You Have Created Your First Blog In 2023 Finished all the steps on “How To Start A Blog In India“ But What Next? This is not the end, but I think this is the beginning of your journey, and you have to learn many things like SEO, Affiliate Marketing, and Many More things.
Final Conclusion On How To Start A Blog In India
For being a successful blogger, you have to learn many things and implement all things in your blog to see the results. I recommend you create the habit of learning and always learn new things by reading the blog and much more stuff. I hope you like this article, and maybe this helps you to create your new successful empire today. I also recommend you join our Free Blogging Community to stay updated with new stuff. I too very active in my group, so if you have any doubts, I will personally help you and clear you’re every doubt. Every single share counts for us! I appreciate your effort.